instructions for sewing a truncated cone bag

Post #1 made 11 years ago
[MODNOTE: Also see post #24 for a spreadsheet by bionut which does some of these calcualtions for you.]

This is a step-by-step tutorial for generating a fabric pattern for the two main pieces of fabric you will need to sew a fustrum(truncated cone)-shaped brew bag. You will cut one circular panel that will be the bottom of your bag, and one long, curved panel that will form the wall of the bag. I’ll be giving examples of the math involved using numbers from my brew pot, as well as the formulas you’ll use to identify the dimensions you’ll need for your brew pot. The dimensions I’m using will be in inches, but the formulas will work using any unit of measure you like, provided you use the same unit of measure for all the variables. This method also assumes you have a (roughly) cylindrical brew kettle. I will also document the process of sewing the bag, however there are many different techniques so the one represented here is just my own and may not be the best one, or the best one for you.
fustrum.jpg
Step 1: determine the height (h), upper radius(r1), and lower radius(r2) of your fustrum.
Measure the height of your brew kettle and multiply that number by 1.15. Then add an allowance for your drawstring/webbing/tabs/handles/whatever you want to add to the top of your bag. This value will be “h”, and represents the height of the fustrum. My brew pot is 15.25” tall, and I want an extra 1” on the top of the bag for nylon webbing and handles. So:

Formula: (brew kettle height x 1.15) + handle allowance = h
Example: (15.25” x 1.15) + 1” = 17.40”

Measure the outer diameter of the top of your brew kettle and multiply that number by 1.15. Then divide that number by two, to get the upper radius (r1) of your fustrum.

Formula: (brew kettle upper diameter x 1.15)/2 = r1
Example: (12.75” x 1.15) / 2 = 7.33”

Measure (or estimate) the inner diameter of the bottom of your brew kettle, and multiply that number by .85. Then divide that number by two, to get the lower radius (r2) of your fustrum.

Formula: (brew kettle lower diameter x .85)/2 = r2
Example: (12.25” x .85) / 2 = 5.20”

Step 2: determine the total height (ht) of the cone that your fustrum is a part of.
Since the fustrum is a cone with the top removed, the total height of that cone without that top removed is essential to generating your fabric pattern. That number can be found using the following formula:

Formula: (h x r1) / (r1 – r2) = ht
Example: (17.4” x 7.33”) / (5.20” – 7.33”) = 59.87”

Step 3: determine the length of the side of the cone your fustrum belongs to (b) and the length of the side of the cone removed to make your fustrum (a).

Referring to figure 1, you can see what the dimensions of “a” and “b” represent. These figures are essential to creating the fabric pattern of your bag, as they describe the radii of the two arcs you will draw when putting your pattern on the fabric (refer to figure 2). These are most easily determined using the right triangle calculator at http://www.csgnetwork.com/righttricalc.html" onclick="window.open(this.href);return false;.

Directions:
Input (ht – h) as “Side A”, r2 as “Side B”, and calculate. The value in “Side C” will be value (a) on figure 2.
Clear the values, and then input ht as “Side A”, r1 as “Side B”, and calculate. “Side C” will now be value (b) on figure 2.

Example:
My ht is 59.87”, and my h is 17.40”. 59.87” – 17.40” = 42.41”, so I input this as “Side A”. My r2 is 5.20”, so I input this as “Side B”. The calculator gives me the result of 42.73” as my value for a.
I then clear the calculator and input my ht of 59.87” as “Side A”, input my r1 of 7.33” as “Side B”, and the calculator gives me the result of 60.32” as my value for b.
deconstructed fustrum.jpg
Step 4: determine angle c

When transferring this pattern to fabric, you will begin drawing an arc at a fixed radius, and then continue that arc until it’s as long as r1 or r2, depending on the radius of your arc. Instead of trying to measure distance along a curve ,the easiest way to do this is to determine the angle at which that arc is the distance you want. If your radius calculations are correct, you will achieve the correct r1 and r2 distances at the same angle. The method for that is as follows:

Formula: (r1 x 2 x 3.14) / b = Angle c
Example: (7.33” x 2 x 3.14) / 60.32” = .76 radians

As you can see, this formula gives the angle in radians, which you must then convert to degrees by multiplying that value by 57.3.

Formula: radians x 57.32 = degrees
Example: .77 x 57.32 = 43.56 degrees

So, in my example Angle c is equal to 43.56 degrees.

Step 5: draw your pattern on the fabric

In steps 3 and 4, you have calculated all the values you need to draw your pattern on the fabric. Referencing Figure 2 you will see that two arcs are necessary; one with a radius of “a” and a distance of angle c, and one with a radius of “b” and a distance of angle c. The easiest way to do this is to use a protractor to mark an angle on the floor that is equal to angle c. Then, using a measuring tape or string, measure out the distance of “b” from the apex of the angle, aligning the string or tape with one side of the angle you marked. Now, pivot that string or tape around the apex of the angle, marking along your fabric at the same distance from the apex, until your string is aligned with the other side of the angle. Repeat this process, using radius “b”. Connect the ends of these arcs together, and you have the first panel of your pattern, the wall of your bag!

You can double-check your work by measuring along arc 1 to approximate its length. It should be close to the diameter of your pot, multiplied by 1.15, multiplied by 3.14 (D x 1.15 x 3.14). Check the height of your bag by measuring along “d” (figure 2). It should be slightly larger than the height of your brew pot multiplied by 1.15 (H x 1.15).

The second pattern is easy: mark a circle with a radius of r2 . That’s it!

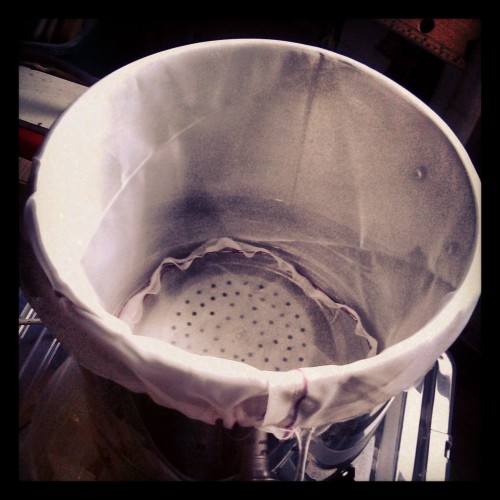
Keep in mind, these patterns do not have seam allowances, so you’ll probably want to cut ½” outside of the pattern to give yourself a little extra fabric to work with. Once the panels are cut out, sew your circle to the edge of arc 2, and connect the ends of the wall panel of your bag. That’s it, you now have an inverted fustrum brewing bag that’s custom sized to your brew kettle. All it took was a little math!

I'm going to sew this thing up tomorrow (hopefully) and I'll try to take a bunch of pictures to make this a little more practical.
You do not have the required permissions to view the files attached to this post.
Last edited by mr.jadkowski on 26 Mar 2013, 03:38, edited 2 times in total.

Post #3 made 11 years ago
Good Day Mr.Jadkowski, your numbers and equations look great.....
Of some of us have a large piece of Voile, dropped into the kettle, Doughed-in and let the Big Corners hang off the kettle captured by a Bungy Cord.....
Honest Officer, I swear to Drunk, I am Not God.
    • SVA Brewer With Over 100 Brews From United States of America

Post #4 made 11 years ago
Looking forward to the pics mr.jadkowski :peace:. You've put a lot of time and effort into that post #1 - very nice :thumbs:.
If you have found the above or anything else of value on BIABrewer.info, consider supporting us by getting some BIPs!
    • SVA Brewer With Over 100 Brews From Australia

Post #6 made 11 years ago
Here is the process of taking all those numbers you came up with and turning them into pieces of fabric that can be sewn into a bag:

1. Lay out your fabric, and measure out "b"
measure_b.jpeg
Start measuring from where you want "Arc 1" to begin. Obviously, my fabric is drastically oversized.. that's 2.3 yards of 60" wide fabric, in reality for my pot only 1 yard is needed, possibly less. As long as your arcs end up entirely on fabric, that's all that matters. Mark the point you measure to; this will be the pivot point you will use to draw your arcs.

2. Measure your angle
measure_angle.jpeg
I used the right triangle calculator referenced in my first post, inputting my "b" measurement (60.32") as "Side B" and my angle c (43.56 degrees) as "Angle A or B". This gives me a length of 57.36". I measured this out perpendicular to my "b" measurement, starting in the same place I began in the last step. If you lay out your fabric like I did, this should be along the back edge of your fabric.

3. Find your angle line
angle_line.jpeg
I used a laser for this step since I had it laying around, but you can also use string or a long straight edge. Start at the pivot point you marked in step 1, and mark a straight line from that point to the end of your "angle measurement" in step 2.
mark_angle.jpeg
4. Put loops in your string at the same length as "a" and "b"
loop_a.jpeg
Tie a loop in the end of your string, lay it out in a straight line, and without cutting the string tie a second loop in the string once you've reached length "a". Once you've tied the loop, put a little tension on the string and make sure the distance is correct.
loop_b.jpeg
Continue to lay out your string in a straight line, and put a second loop in at length "b". Again, check to see that it's the correct length when tension is applied. You'll see that mine is a little short; once the string is stretched it assumes the correct dimension. Once your loop is tied, you can cut off the excess.
You do not have the required permissions to view the files attached to this post.
Last edited by mr.jadkowski on 27 Mar 2013, 21:16, edited 2 times in total.

Post #7 made 11 years ago
5. Mark your arcs
mark_arc_1.jpeg
Secure the end loop (the first loop you tied) at your pivot point. Now, put whatever you're using to mark your fabric (I'm using a water-soluble fabric pencil) into the loop for arc one. While maintaining a roughly constant pressure on the string, swing across your fabric until your chalk/pencil/whatever gets to the angle line you marked in step 3. Repeat this using the loop you tied for arc 2.
arc_2 complete.jpeg
This can be tricky since whatever you're using to mark will want to drag the fabric across the floor; do your best to keep this from happening. It works better to make a very light mark when doing this step and go back later to put a darker, easier to see mark over the first before you cut. You should now have a piece of fabric marked that looks roughly like the gray area in figure 2.

6. Mark your circle
mark_circle.jpeg
Tie one more loop in your string just like the ones you did for "a" and "b", but this time use your r2 measurement as the length. Using a pen or pencil to keep the pivot point stable, swing your marking device around this pivot point until you've marked a complete circle. This will be the bottom of your bag.

7. Cut out your fabric
fabric_panels.jpeg
Remember, the lines you marked are where you want your seams, so be sure to leave yourself some seam allowances around the edge.

8. Sew!
completed_bag.jpeg
Here's my completed bag; it drapes nicely outside the pot, has a minimum of folds inside the pot while rougly conforming to the size and shape, and has a flat bottom that has about an inch of space between the edge of the bag and the edge of the pot. Hopefully this will give me the maximum volume inside the bag for the grain to mix with strike water, while still draining inside the rim of the pot when it's lifted out. I'm going to brew with it this weekend and see how it turns out!
You do not have the required permissions to view the files attached to this post.
Last edited by mr.jadkowski on 27 Mar 2013, 21:31, edited 2 times in total.

Post #8 made 11 years ago
I brewed with this bag yesterday and it worked great! Lots of space in the kettle to mix grain and water during the mash, very little twisting while I was stirring, and I was able to lift the bag off the bottom of the kettle to heat the mash up for a mash out using a bungie around the outside of the kettle. The bottom of the bag is contained "inside" the diameter of the kettle while the mash drains. I ended up with an efficiency-into-kettle of 80.5% using double-ground grain, which was a lot higher than I expected for my first try. I didn't do anything fancy to wring the mash out other than twist up the bag a bit, and let it drain in a bucket while the wort was coming up to a boil.

Also, I found a great way to insulate your kettle while mashing. I took an old sleeping bag, and simply put the whole thing over my kettle and burner once the burner was off. Started at 153 degrees, and the mash dropped 3 degrees over 90 minutes, including a stir at 45 and 15 minutes.
photo (4).JPG
Sorry about the sideways picture.
You do not have the required permissions to view the files attached to this post.
Last edited by mr.jadkowski on 31 Mar 2013, 23:26, edited 2 times in total.

Post #9 made 11 years ago
Excellent posts jad - again! I suspect this thread will get stickied in some manner or other.

A few things I noticed in the last post were, "double-ground grain," and "very little twisting whilst stirring."

On the double-ground grain, make sure you are doing it for the right reason. A floury mash is not good. Have a read of this post.

On the twisting bit, avoid using a mash paddle or spoon which require stirring and use the far more efficient masher which requires a simple up and down motion.

No bag twisting and far better mixing :party:,
PP
Last edited by PistolPatch on 01 Apr 2013, 20:49, edited 2 times in total.
If you have found the above or anything else of value on BIABrewer.info, consider supporting us by getting some BIPs!
    • SVA Brewer With Over 100 Brews From Australia

Post #10 made 11 years ago
Mr. Jad.

Excellent process you have described there.

I have followed it and I was able to follow through to the drawing stage. I did all my drawing on paper. I did this as a test. My math skills are very poor, and I did not want to screw up my fabric with my mistakes. I have cut out my paper patterns and the seem to fit my new pot well.

Ill be transferring to fabric and sewing tomorrow!

Thanks again!
"All I know is that the beer is good and people clamor for it. OK, it's free and that has something to do with it."
Bobbrews
    • BME Brewer With Over 5 Brews From United States of America

Post #11 made 11 years ago
Mr. Jad,

Worked like a charm! Transferred my paper templates to the fabric, cut it out with 1/2 inch overhangs for seams, and sewed it up!

Thanks!

trout
"All I know is that the beer is good and people clamor for it. OK, it's free and that has something to do with it."
Bobbrews
    • BME Brewer With Over 5 Brews From United States of America

Post #13 made 11 years ago
The bag worked great!

I also used my new pot. Ive been borrowing a huge aluminum pot from a friend, and wanted a stainless steel pot. I bought a 62qt stainless Bayou Classic. I adjusted my equipment profile and brewed my house Centennial Blonde. I really dont worry about it much, but yesterday was one on the few times that I really I hit my numbers. I even remembered to use whirlflock.

trout
"All I know is that the beer is good and people clamor for it. OK, it's free and that has something to do with it."
Bobbrews
    • BME Brewer With Over 5 Brews From United States of America

Post #16 made 10 years ago
Firstly, great to see 2trout and Zymeck's posts confirm Jad's hard work adds up :thumbs:.

Firspring, there are two things to consider here, length and width of the material. I'm not too sure what width material comes in but I think most material rolls would definitely be wide enough to service pretty much all kettles however...
A safe width of the material roll would be about 1.2 X the height of your kettle.
As for length, I am not going to work it out properly as material is so cheap. The following though will work well for all designs...
A safe length of material to purchase is 5 X the diameter of your kettle.
So, if your kettle is 40 cm in diameter, buying 200 cm (2m) of material will be enough to do any sort of bag.

:peace:
PP
Last edited by PistolPatch on 28 Jun 2013, 20:06, edited 2 times in total.
If you have found the above or anything else of value on BIABrewer.info, consider supporting us by getting some BIPs!
    • SVA Brewer With Over 100 Brews From Australia

Post #17 made 10 years ago
Hey guys,
At first thanks for the nice intruction. I give my best to calculated the right dimensions for my bag.
Just to get save.. have i understand your instruction in the right way? here is a small graphic with my understanding:
Image
Is that the right way to cut my fabric?

My pot have this dimensions: (60cm outer diameter ; 64cm height)
h = (64cm *1,15) + 2,5cm = 76,1cm
r1 = (60cm * 1,15) / 2 = 34,5cm
r2= (60*0.85) /2 = 25,5cm
ht = (76,1cm * 34,5cm) / (34,5cm – 25,5cm) = 2208/ 9 = 291.72cm
a= 217.12cm
b= 293.75cm
---
Formula: (34,5cm *2 * 3.14) / 293,75cm = 0,74 radians
0,74 * 57,32 = 42,42 degrees
So, for my BIAB the Angle c is equal to 42,42 degrees

Is there all correct so far?

Thanks for ur tipps and ur help,
Fabian
Last edited by Advanced on 12 Jul 2013, 05:13, edited 2 times in total.
Check my Blogs for pictures and videos. Sorry but actually just in german language.
www.freubreu.wordpress.com

Post #18 made 10 years ago
Hey guys.. I just try it on a big cellar floor! I mark the triangle on the floor cause it was a big one... (dont get a big paper like that [~2,20*3m])
So at the first step i go for a model! But check it out, here are some pictures!
Image
Image
Image
Image
Image
Image

Well i think i do it on the right way! The sizes arent bad... so next step, i cut the circle :D

Best regards, see you soon!
Fabian


Here are more Pictures with bigger sizes:
https://www.dropbox.com/sh/f92hlq3dbhbas4j/0wfdb0EEFc" onclick="window.open(this.href);return false;
Last edited by Advanced on 12 Jul 2013, 21:44, edited 2 times in total.
Check my Blogs for pictures and videos. Sorry but actually just in german language.
www.freubreu.wordpress.com

Post #21 made 10 years ago
Since you're working with a material that's fairly stretchy I don't think it would cause too much of a problem. Your cone will be a little lopsided, since the side of the cone opposite your seam will be a bit shorter than the seam side. However, it will be a lot closer to that "ideal" shape than some of the other bag designs out there. Try it out and tell us what you think!

A quick side note: I've been getting 90%+ efficiency from my mash using this bag, brewing lower-gravity beer. I know there are a lot of other factors, but I think part of it is that the full volume of the kettle is available to mix water and grain. The mash is a bit thinner, and the efficiency goes up. It's definitely a hit for both ease and economy of brewing!

Post #22 made 10 years ago
Yes, I could make it a pentagon or hexagon (a hexagon with a pushed in side) instead to be even closer, but I decided it is not so hard to follow your instructions and make it properly. Using a sewing machine is hard though!

Thanks

Post #23 made 10 years ago
My BIAB bag needs the seams re-sewing, but I thought I would have a go at making another bag first.

Rather than cut paper etc. I thought, just calculate all the parameters & draw it in 3D CAD & see if it fits, so here is a 2D drawing of (my size pot) BIAB bag.
biab bag.jpg
The images top right (3)are the cone shape & base assembled in-situ. Looks perfect to me :thumbs: Thank you very much Mr. Jadkowski

The really useful thing here is not having to measure angles, I can just mark the distances & join up the lines!
You do not have the required permissions to view the files attached to this post.
Last edited by mally on 30 Jul 2013, 21:16, edited 2 times in total.
G B
I spent lots of money on booze, birds and fast cars. The rest I squandered
I've stopped drinking, but only when I'm asleep
I ONCE gave up women and alcohol - it was the worst 20 minutes of my life
    • SVA Brewer With Over 100 Brews From Great Britain

Post #24 made 10 years ago
Thank you mr.jadkowski!

I put all the calculations in a spreadsheet to make it easier to calculate. I hope you don't mind :)
You do not have the required permissions to view the files attached to this post.
Post Reply

Return to “Bags, Mashers, Thermometers, Kettles etc.”

Brewers Online

Brewers browsing this forum: No members and 12 guests

cron