Single vessel electric system - Braumeister clone

Post #1 made 12 years ago
Hi

I’m an Italian homebrewer and I have started some moths ago a project in order to build a single vessel electric heated brewing system ..something similar to the well known Speidel Braumeister . The main driver behind this project was to build an “all in one” system very compact, light, easy to use, easy to clean system that implements the BIAB process and brewing philosophy

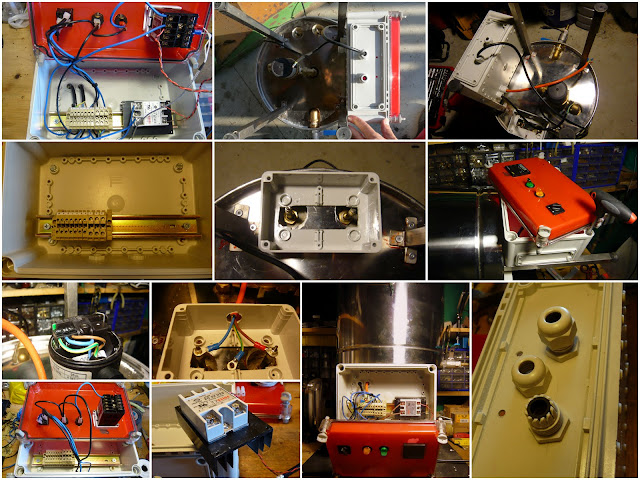
Now I’m completing last construction details and I’m near to close the “make” phase and start testing the system. In order to understand all the fundamentals of BIAB brewing I have registered the forum and started reading the posts. Lot of useful information and ideas … and viceversa I would like to share my project details open to any comments and suggestions

Let’s start from some construction details and schema !

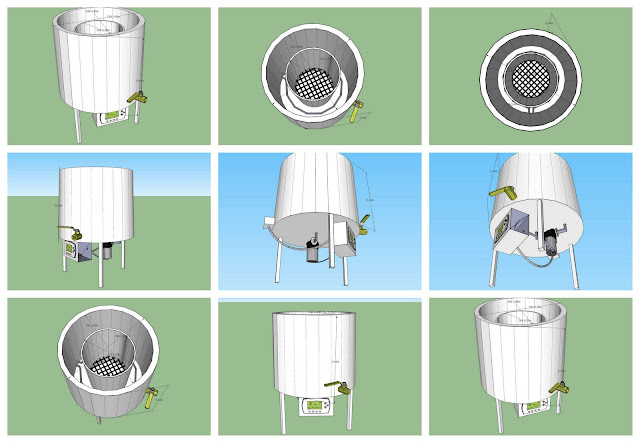
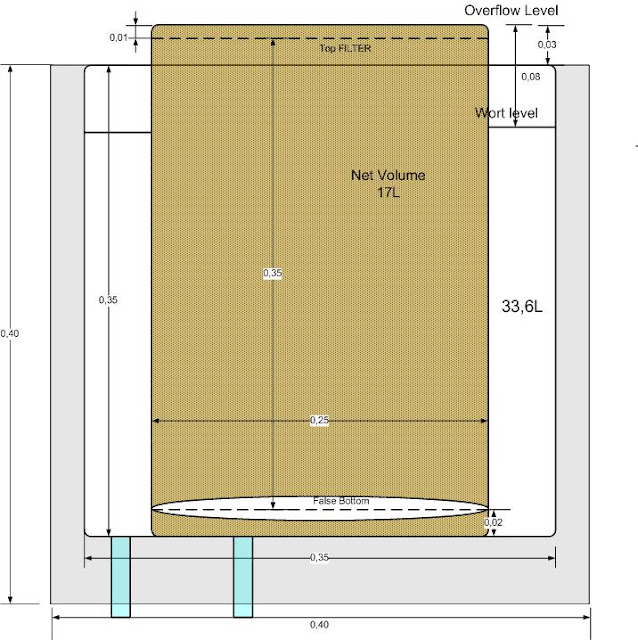
Here is some printout of Google sketchUP 3D CAD and a 2D drawings
Image
Image
I will use for the external vessel a stainless steel thermo pot with external diameter 40cm and internal 35cm…the suitable eight is 40cm…so I have a total volume of 38L. The use of a thermo insulated pot should help boiling and mashing with lower power.

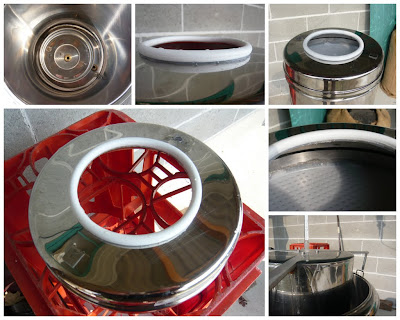
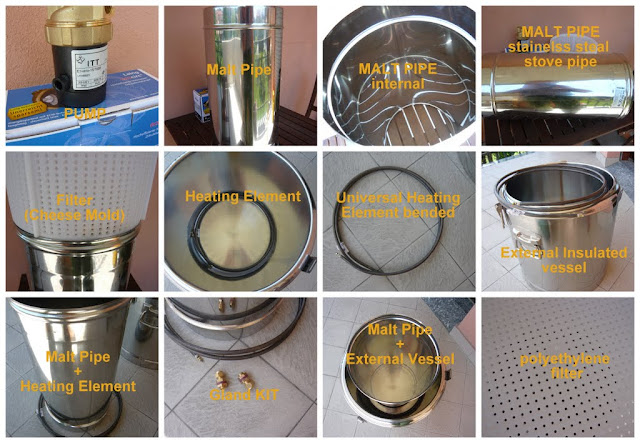
Inside the external vessel there is the “malt pipe” . I have used a light stainless steal stove pipe . The diameter is 25cm in order to have enough space for heating element, pump inlet/outlet and so on. Few centimeter from the bottom I have inserted a polyethylene false bottom cut form a cheese mold. The polyethylene is food grade and can resist to hot temperature, moreover it’s easier to cut and shape than stainless steal. The bottom of cheese mold has the right size hole and they are a little bit conical.
Image
In order to fix the filter to the pipe I take the advantage that the pipe is conical and one side has a slightly higher diameter. Everything is sealed by food grade silicone
Considering empty space on the bottom and 1-2 CM of difference on the top the malt pipe I have a total volume of 18-19 L ( 25 cm radius x 40 cm height)
Image
The pipe must be pressed to the bottom in order to seal it. This is one of the most critical point…I have tested different sealing solution but with poor results…now I’m waiting for a custom designed silcon U channel extruded seal in order to fix the problem.
Image
The heating is provided by a general purpose bend to shape heating element…the total power is 2,5Kw and the length it’s perfect in order to create 2 coils inside the external vessel. I have also bought a gland kit in order to fix and insulate the terminal
Image

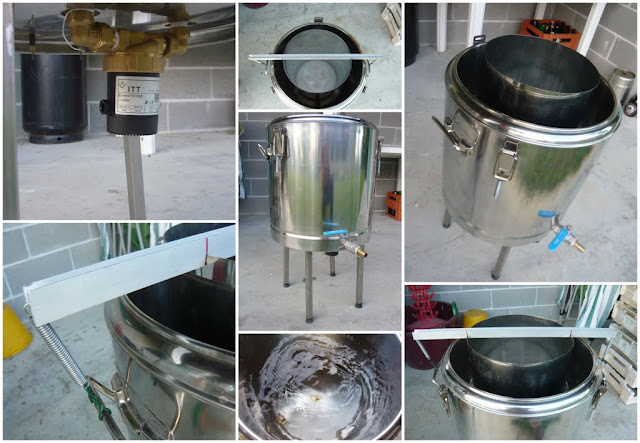
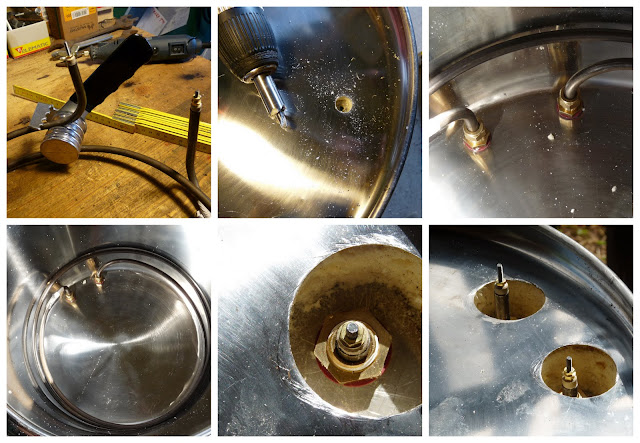
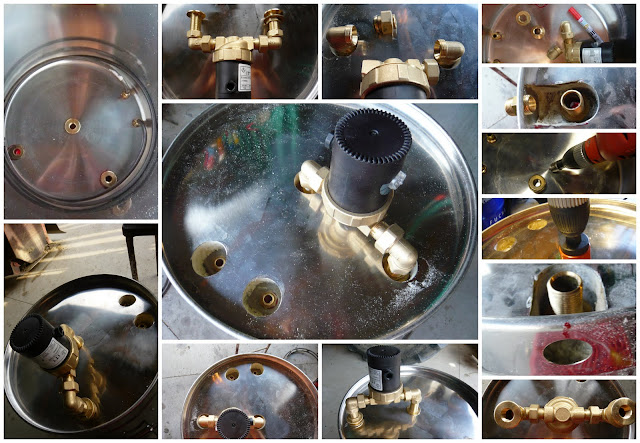
At the end there is the circulating pump…I think is a well known component for the recirculation…Laing Ecocric E1 with ½’’ inlet/outlet. It has been fixed on the bottom of the external vessel
Image
Pump and heating element are controlled by a panel where I have inserted a PID controller and SSR relay and all the switches and cables
Image
I have added 4 legs to support the external vessel…some industrial surplus with fine regulation of the height…I have modified in order to join to the bottom of the vessel and the complete set up is very compact and light.
Image
Hope you like my assembly and I will update as soon I have solved the sealing issue and I start testing BIAB brewing
:thumbs:
enjoy
Davide
Last edited by arzaman on 21 Oct 2011, 00:13, edited 6 times in total.
    • BME Brewer With Over 50 Brews From Italy

Post #2 made 12 years ago
I am very impressed Davide, fantastic bit of engineering there! Makes my build look like something that was thrown together over a few beers.

I do have to ask: Is it really a good idea to have the control box mounted to the rig, as opposed to extending the wiring so that you can move it a safe distance from the pot? It seems that a simple boil-over will cause hot liquid to run down the side of the pot and all over the control box. It appears to be a liquid-tight box, but.....


---Todd
WWBBD?
    • SVA Brewer With Over 100 Brews From United States of America

Post #4 made 12 years ago
Thank you all for the compliment...! very appreciated..I'm very happy to share my project but in Italy we are used to say..."non dire gatto se non ce l'hai nel sacco"...I let you translate but the point is that I will be satisfied as soon as I have produced the first batch of wort ..or better the first pint of beer !

Coming to your questions...
You are right the box is watertight and I have used proper cunduit for the cables. The idea was to keep the assembly as compact as possible...other options coud be to mount everything on a trolley and have a remote control box.
Could be implemented in step 2 ...the idea is to automate the process with a controller (arduino based) and add a wort chiller and some automated ball valve to control all the steps from water load to wort chilling..

now I have to complete the step 1 ...main problem is malt pipe sealing...I'm sourcing a proper gasket than if it works I will start to test...and to share results ...:-)

Davide
    • BME Brewer With Over 50 Brews From Italy

Post #7 made 12 years ago
stux wrote:Lovely build

Here is a link to another Braumeister Homage, the BrauMeiser
http://www.aussiehomebrewer.com/forum/i" onclick="window.open(this.href);return false; ... raumeister
Thank you for the reference ..there are few realizations of braumeister clones around the net where I got my inspirtaion.. one of this is the brewtroller forum where above the rig implementation there are lot of info on proces "automation" via brewtroller board

http://brewtroller.com/forum/showthread.php?t=1114

Now I register the aussiehomebrewer forum in order to see images...for sure I will find useful suggestion !

ciao
Davide
Last edited by arzaman on 21 Oct 2011, 16:17, edited 5 times in total.
    • BME Brewer With Over 50 Brews From Italy

Post #9 made 12 years ago
Hi
I have played a little bit around the sealing issue…one point I would like to improve was the system on the top of the malt pipe that press down on it in order to guarantee sealing
I have build a little aluminum cross that has 3 anchorages on the external vessel (the one used for the original cover)
Image
In this way I can easily lock the malt pipe and with the external lever amd proper spring I can apply a good pressure on the malt pipe…

The result seems encouraging…with the old silicon seal I was able to see the water level going up…I expect that with the new U channel silicon seal I’m waiting everything could work

Moreover I have a short threaded pipe in the middle of the cross where I can screw in the top filter. Easy solution to apply and remove at the end of the mash phase.

Hope next post will be the final one with a video of the complete solution.. :thumbs:

Ciao
Davide
Last edited by arzaman on 25 Oct 2011, 16:03, edited 5 times in total.
    • BME Brewer With Over 50 Brews From Italy

Post #11 made 12 years ago
Hi
Still fighting with sealing issue…I have received the spare part of the original malt pipe…and it looks great for sealing pourpose : it’s U channel ring enough thick and compressible
I had to cut in the middle and shorten the total length than I have applied to edge of my stove pipe. It fits quite well and stay attached on the edge as you can see in following pictures
Image
So I was expecting to fix the sealing issue once and for all…but filling the rig with water and starting the pump again poor sealing and non change to fill the malt pipe even applying a strong pressure on the top.

I have tried to troubleshoot again the situation filling the malt pipe from the internal and looking where the leakages occurs….than I have tried with a light inside the malt pipe in a dark environment in order to highlight any empty space between the silicone sealing and the bottom.
With both methodology I was able to detect some leakages…in few zones maybe less than 1mm
The point is that some imperfections of the bottom and the edge are present…and are not compensated by the silicone sealing.
I realize that the fittings and connector applied to the bottom have slightly modified it …the stainless steel bottom is very thin and tightening the connectors in some way the bottom has been modified.

At this stage I have two chance…continue with current approach or change the approach (using a pot with a quick disconnect connector or camlock connector)…

Last idea I had is to use a liquid silicon rubber mouldable…!!

http://www.prochima.com/ENG/product.asp?id=7

I have discovered a lot of interesting products that allow you to build your own moulds …they are made of two component and you can mix in order to obtain a paste.
The idea is to use the paste to produce a custom sealing that perfectly compensate the bottom/pipe imperfections…
What do you think about ?? It’s worth while to try ?

Davide
Last edited by arzaman on 26 Oct 2011, 21:38, edited 5 times in total.
    • BME Brewer With Over 50 Brews From Italy

Post #12 made 12 years ago
Weld a metal ring on the bottom for the seal to mate with?
Fermenting: -
Cubed: -
Stirplate: -
On Tap: NS Summer Ale III (WY1272), Landlord III (WY1469), Fighter's 70/- II (WY1272), Roast Porter (WY1028), Cider, Soda
Next: Munich Helles III

5/7/12

Post #13 made 12 years ago
Hi Davide

Great post I'm just sorry it's not going to plan :sad:

Looking at your seal I think its just not flexible enough to compensate for the bottom of your pot being a bit uneven. Have you looked at possible splitting a silicone hose ? These are soft and get even softer when hot and may give a better seal. Thinking about it have you tried your new seal with hot water ?? it may be more pliable when hot and mould to the bottom of the pot better.

One more thing and forgive me if I'm stating the obvious, how much downward pressure are you applying? sometimes too much pressure can be counter productive and deform the mating surfaces. Perhaps trying with hot water and varying seal pressures.

:luck:

Yeasty

Edit: Another thought..Is it possible to insert an "O" ring into the channel of the seal then fit it to your malt pipe. This would increase the seals depth and perhaps make it work better ?
Why is everyone talking about "Cheese"
    • SVA Brewer With Over 50 Brews From Great Britain

Post #14 made 12 years ago
Yeasty wrote:Hi Davide

Great post I'm just sorry it's not going to plan :sad:

Looking at your seal I think its just not flexible enough to compensate for the bottom of your pot being a bit uneven. Have you looked at possible splitting a silicone hose ? These are soft and get even softer when hot and may give a better seal. Thinking about it have you tried your new seal with hot water ?? it may be more pliable when hot and mould to the bottom of the pot better.

One more thing and forgive me if I'm stating the obvious, how much downward pressure are you applying? sometimes too much pressure can be counter productive and deform the mating surfaces. Perhaps trying with hot water and varying seal pressures.

:luck:

Yeasty

Edit: Another thought..Is it possible to insert an "O" ring into the channel of the seal then fit it to your malt pipe. This would increase the seals depth and perhaps make it work better ?
Thank you yeasty for the useful advices and suggestions..

I have tried more or less all your suggestions…the use of a splitted silicone hose (I have tested 2-3 different diameter) does not produce positive results
About the hot water every time I test a sealing I switch the heating element in order to heat the water…no appreciable results obtained compared to cold water.

About the pressure you are right…according to the relative position and pressure on the malt pipe I got more or less sealing…it confirms that the bottom is not perfectly flat..

Now , as I have indicated, I’m waiting for a silicone liquid rubber mouldable in order to build a custom sealing…few days and I will post the result !

Regards
Davide
Last edited by arzaman on 02 Nov 2011, 22:54, edited 5 times in total.
    • BME Brewer With Over 50 Brews From Italy

Post #15 made 12 years ago
During the raining week end I had time to proceed with the last attempt to seal the malt pipe with the external vessel. Since I was not able to find a proper silicone sealing the idea was to build myself the sealing using silicone rubber mouldable

I say in advance that the result is ok ! at the end of the day I achieved my aim and I’m quite satisfied of this custom solution ! :thumbs: :thumbs:

The product is provided with two different oaste components…you have to mix in equal part and than you can mould very easly in any form.
The main attention is the time to harden …in 3-4 minutes the silicone becomes hard…so you have not so many time to produce an extrusion and apply to the malt pipe.

I had to repeat the procedure two times…the first time an excess of pressure has cut the sealing…the second time I produced a thicker extrusion and even if it’s not so regular it works well.
Here is the result
Image
The sealing compensate all the errors in the bottom and the pipe…it’s soft enough an can be easily compressed.

Now the water level can easily reach the top of the malt pipe and even without any pressure …just with the malt pipe water weight…the leakage is very low and the flow is stable.

You can see the result with pure water in this video.

http://youtu.be/HDFqfHjE7-c

Finally I have built the top filter with again with a cheese mold bottom and fine grid. The filter is anchored to the top cross and can be easily inserted and removed.
Image
Since everything was ready I have done a final test with 4kg of crushed malt grain …just to see if the pump , the filter, the sealing, the heating element is ok in running condition…and everything seems work well as you can see in this last video !

http://youtu.be/S6Toru4CIJQ

I have to fine tune some minor issue but I’m ready for the first batch…I have to work on the recipe and perform all the calculation for my rig…but the spreadsheet calculator from BIAB forum is a great help !

I will continue update with the first beer results…for the moment thank you all for inspiration, suggestions, help, advices…

Davide
Last edited by arzaman on 07 Nov 2011, 19:02, edited 5 times in total.
    • BME Brewer With Over 50 Brews From Italy

Post #16 made 12 years ago
Great job arzaman. :thumbs:

I think that time for a pan european BIAB brew day meeting (before Greece comes out of Euro ;) because then we should organize a mediterranean meeting lol) gets closer

Post #17 made 12 years ago
Well done arzaman,, love the video not sure about the music :dunno:

Whats your plans for your first brew and how big a beer can you brew taking into account the capacity of the malt pipe ?

:thumbs:

Yeasty
Why is everyone talking about "Cheese"
    • SVA Brewer With Over 50 Brews From Great Britain

Post #18 made 12 years ago
Yeasty wrote:Well done arzaman,, love the video not sure about the music :dunno:

Whats your plans for your first brew and how big a beer can you brew taking into account the capacity of the malt pipe ?

:thumbs:

Yeasty
I'm playing with the BIAB calculator in order to adapt it to my equipment size...The idea is to start with a well experienced recipe (belgian blond or american pale ale) and to scale to BIAB process and new system !

About the music…I perform an audio substitution via you tube…with the option…”I feel lucky”…that chose a random sound track :lol:
Last edited by arzaman on 08 Nov 2011, 00:59, edited 5 times in total.
    • BME Brewer With Over 50 Brews From Italy

Post #22 made 12 years ago
Should brew an Italian clone of a german brew ;)
Fermenting: -
Cubed: -
Stirplate: -
On Tap: NS Summer Ale III (WY1272), Landlord III (WY1469), Fighter's 70/- II (WY1272), Roast Porter (WY1028), Cider, Soda
Next: Munich Helles III

5/7/12

Post #23 made 12 years ago
Hi
Some improvements and enhancements to my rig.. one of the main issue that I Had to face was the sealing of the malt pipe made with a stove stainless steal pipe and the external vessel.
I have tried different solutions more or less effective…last one a self made sealing using mouldable silicone rubber.
Image
Now I have changed the approach: I have bought a plug for the stove pipe hand I have implemented a 15cm hole where I have applied a soft and thick silicon O-ring.
The plug could easily inserted and removed from the stove pipe and the contact surface is much higher and guarantee and optimal sealing.
In this way I have a light and modular solution and the hole dimension allow me to drain the wort more easily than a pot with just a small connector.

The video below show you the assembling and you can see that the flow rate of the pump eliminating the leakage is quite good :thumbs:

http://youtu.be/QjXofrOrU5c

enjoy
Davide
Last edited by arzaman on 08 Mar 2012, 21:07, edited 5 times in total.
    • BME Brewer With Over 50 Brews From Italy

Post #24 made 12 years ago
Looks neat too
Fermenting: -
Cubed: -
Stirplate: -
On Tap: NS Summer Ale III (WY1272), Landlord III (WY1469), Fighter's 70/- II (WY1272), Roast Porter (WY1028), Cider, Soda
Next: Munich Helles III

5/7/12

Post #25 made 12 years ago
At the end I perform my first BIAB application..

here the day storyboard

http://youtu.be/uQIQUxqv408

something to tune but everyting seems ok..not so far from the BIAB calculator..

I will share numerci details next post

ciao
Davide
Last edited by arzaman on 18 Mar 2012, 04:49, edited 5 times in total.
    • BME Brewer With Over 50 Brews From Italy
Post Reply

Return to “BIAB Automation”

Brewers Online

Brewers browsing this forum: No members and 8 guests

cron